Using Docker for Desktop and VSCode to Develop Locally
Environment Prerequisites
Requirements:
git
Docker Desktop (tested on MacOS - Intel only)
VSCode
VSCode Extensions: Docker (Microsoft), Remote - Containers (Microsoft)
Already followed and have running the ST2 docker-compose setup <https://github.com/stackStorm/st2-docker>
Note
Make sure you set the configuration (through environment) for “export ST2_PACKS_DEV=CUSTOMPATH” per the README instructions<https://github.com/stackStorm/st2-docker#step-by-step-first-time-instructions> so that you mount a local dir to the container’s pack.dev
Overview
Note
This was only tested on MacOS 12.2.x (x86_64/Intel) with Docker Desktop for Mac 4.5 and VSCode 1.65
These instructions were originally developed to get around the issues of local development on MacOS. There are still some dependencies under requirements.txt for building st2 libraries that are not compatible with MacOS (mainly pyinotify). The method described here lets us get around these issues by leveraging VSCode Extensions and a local docker-compose setup of StackStorm.
Instructions
Your docker-compose should already be running with all of the st2 containers. Go ahead launch your VSCode application.
Setup in VSCode
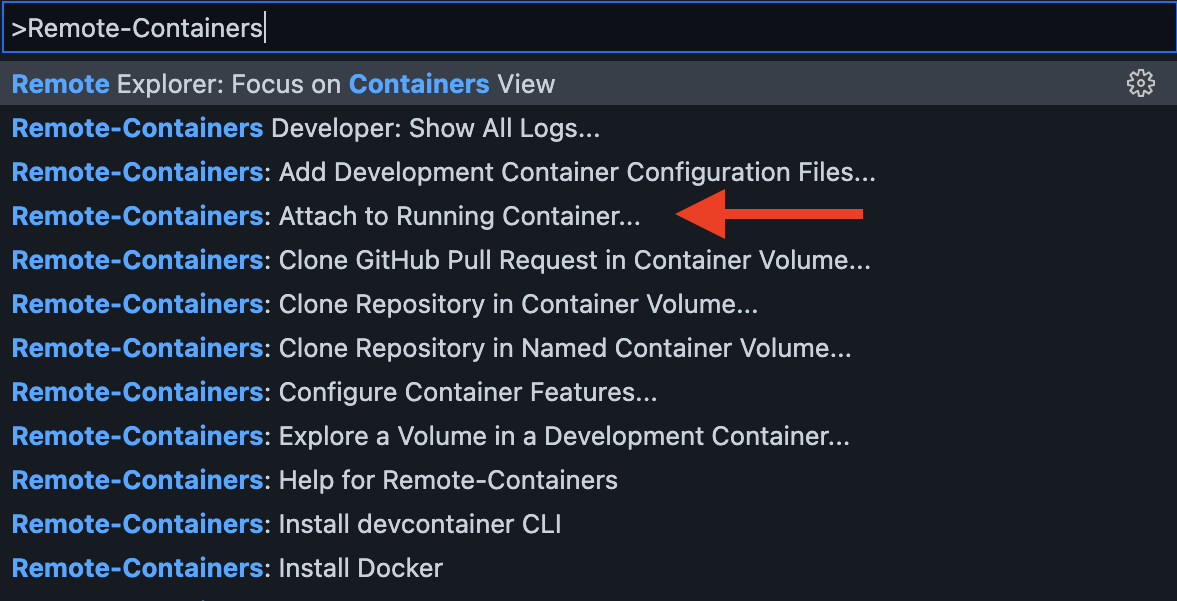
Open your Command Palette (Shift+Cmd+P on MacOS), and enter: Remote-Containers and look for Remote-Containers: Attach to Running Container....
A list of running containers appear. Select /st2-docker_st2client-1 (which is based on an st2actionrunner image, so don’t worry if you see that later
instead of st2client).
A new VSCode Window should pop up and begin attaching to the st2client container. You can verify by looking at the connection status in the lower-right corner
of VSCode. It should say Container stackstorm/st2actionrunner:latest".
When you are running VSCode on remote systems or containers, it installs a local support package of VSCode. This means the extensions you have installed on your local VSCode are not available. For our purposes here, we need to install the python extension(s) again. Go ahead and install the extensions you normally would for python.
Now let’s add our development directories (that are mapped to a local directory). Since we are now attached to the container, we can access and develop directly
in the pack.dev directory. Go ahead and select Open Folder and then input /opt/stackstorm/packs.dev/.
packs.dev is where you’ll add the packs you want to develop. You can create a new folder myNewPack or you can git clone a template from the exchange.
You can also do this directory in the attached container, or locally in your mapped directory.
The last thing we need to do and to point VSCode’s python interpreter to the correct place. This enables the virtual environment context in VSCode which gives
us access to st2 libraries such as st2common, st2reactor, etc, making development much easier.
Open your Command Palette again and enter: Python: Select Interpreter
It may or may not automatically detect the system interpreter (which we do not want), but it’s likely you will need to manually specify the correct path.
Select Enter interpreter path and type / point it to /opt/stackstorm/st2/bin/python. Now VSCode should automatically set the interpreter path and detect
the st2 venv for the virtual environment.
Once this is all complete, you are ready to develop on MacOS with full access to st2 libraries with intellisense and validation.
Note
Testing frameworks have not been tested using this method.