What is ChatOps?
ChatOps is a new operational paradigm - work that is already happening in the background today is brought into a common chatroom. By doing this, you are unifying the communication about what work should get done with the actual history of the work being done. Things like deploying code from Chat, viewing graphs from a TSDB or logging tool, or creating new Jira tickets…all of these are examples of tasks that can be done via ChatOps.
Architecture
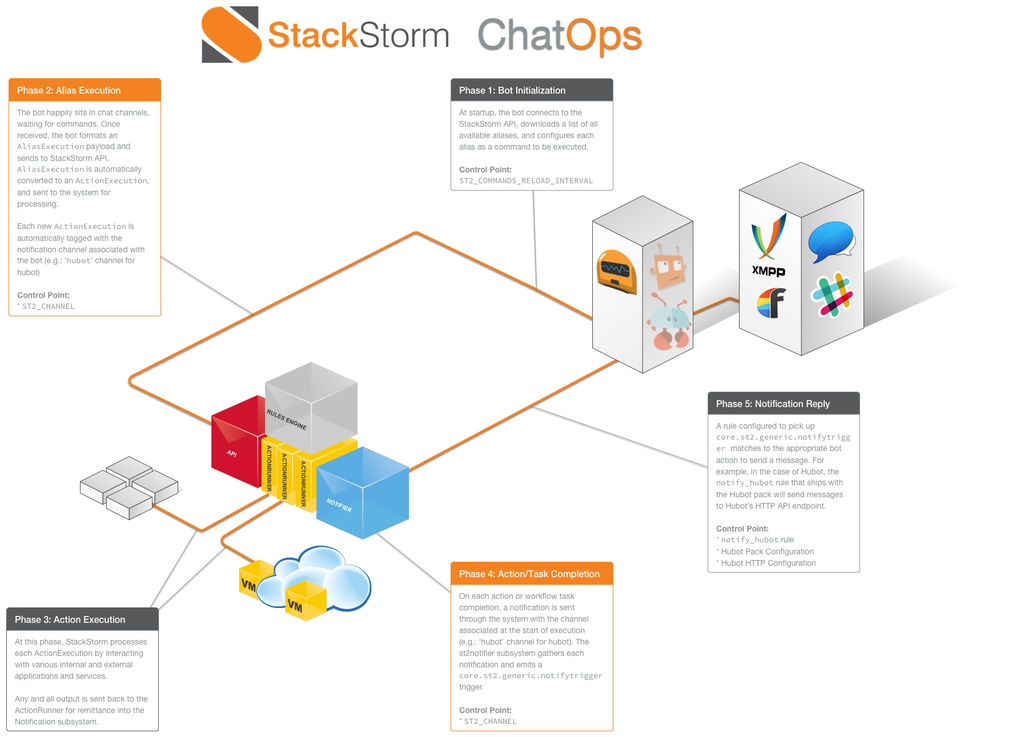
StackStorm ChatOps Integration Overview
ChatOps leverages two components within StackStorm in order to provide a fluid user experience. These subsystems are the Action Aliases and Notifications subsystems. You can learn more about each of these individual components in their corresponding sub-sections.
StackStorm-flavored ChatOps
Our goal with ChatOps is to take common patterns and make them consumable by teams of all makeups. Behind our implementation of ChatOps lies the operational scalability and stability of StackStorm, allowing you to grow and unleash the latent power of your existing teams. In addition to allowing integration with a plethora of existing plugins and patterns available in the larger StackStorm and ChatOps communities, we’ve added these features to the tool-belt:
History and Audit. Get complete history and audit trails of all commands executed via ChatOps. Learn and understand how people are consuming the automation via ChatOps. Enhance your understanding.
Workflow. Get real with workflow. Go beyond linear Bash scripts and upgrade to parallel task execution.
Bring your favorite tools! Each bot comes with its own requirement to learn their language. Forget that mess! Bring the tools that make you productive.
We want to make ChatOps approachable by every team in every circumstance. This means an understanding of how teams of all sizes run, in many different types of verticals. Issues like compliance, security, reliability: these concerns are at the forefront of our minds when we think about what ChatOps means to us, and how it provides real-world value to you.
Officially Supported Chat Providers
We officially provide support for the following chat providers with hubot:
Officially Unsupported Chat Providers
We do not provide support for the following adapters as of st2chatops 3.9. They are still bundled in the
st2chatops 3.8 package, and can be configured in st2chatops.env, and may still work.
Microsoft Teams (via BotFramework) See 3.8 documentation
Configuration
Package-based Install
If you installed StackStorm following the install docs, the st2chatops
package will take care of almost everything for you. Hubot with the necessary adapters is already
installed, and StackStorm API keys have been configured.
You just need to tell StackStorm which Chat service to use - e.g. Slack. You will also need
to give it credentials. Your Chat service may also need configuration. For example, to configure Slack,
you first need to add a new Hubot integration to Slack. You can do this through Slack’s admin interface
using the following example bot yaml definition.
Take note of the HUBOT_SLACK_BOT_TOKEN and HUBOT_SLACK_APP_TOKEN that Slack provides.
Then edit the file /opt/stackstorm/chatops/st2chatops.env. Edit and uncomment the variables for
your adapter. For example, if you are configuring Slack, look for this section:
# Slack App YAML settings (https://github.com/hubot-friends/hubot-slack?tab=readme-ov-file#sample-yaml)
# Confirm your existing Modern Slack App or a newly created Modern slack app has the above permissions
# export HUBOT_ADAPTER=slack
# Obtain the Bot user OAuth Token on the Oauth & Permissions section
# export HUBOT_SLACK_BOT_TOKEN=xoxb-CHANGE-ME-PLEASE
# Obtain a App-Level Token on the Basic Information section, scopes required: connections:write
# export HUBOT_SLACK_APP_TOKEN=xapp-CHANGE-ME-PLEASE
Edit this file so it looks something like this:
# Slack App YAML settings (https://github.com/hubot-friends/hubot-slack?tab=readme-ov-file#sample-yaml)
# Confirm your existing Modern Slack App or a newly created Modern slack app has the above permissions
export HUBOT_ADAPTER=slack
# Obtain the Bot user OAuth Token on the Oauth & Permissions section
export HUBOT_SLACK_BOT_TOKEN=xoxb-####-####-####
# Obtain a App-Level Token on the Basic Information section, scopes required: connections:write
export HUBOT_SLACK_APP_TOKEN=xapp-####-####-####
Your specific Chat service may require different settings. Any environment settings needed can be added to this file.
Once you have finished making changes, restart st2chatops with sudo service st2chatops restart.
Check your log files to ensure that it is successfully connected.
If you want the ChatOps messages to include the right hyperlink to execution url for the action
you kicked off via ChatOps, you have to point StackStorm to the external address for the host running
the web UI. To do so, edit the webui section in /etc/st2/st2.conf. For example:
[webui]
webui_base_url = https://st2web001.stackstorm.net
Chatops Behind a Proxy
If you use proxies in your environment, you may need to configure st2chatops to use the proxy. If you used
the scripted installation, this has been done for you. If not, configure either /etc/default/st2chatops or
/etc/sysconfig/st2chatops (depending on your Linux distribution), following the same pattern as used for
configuring st2api and st2actionrunner.
Restart st2chatops after creating that file.
Using an External Adapter
The st2chatops package includes adapters for Slack, but if an
adapter for a service you use isn’t bundled there, don’t worry: you can install it manually or try st2chatops 3.8.
For example, here’s how to connect StackStorm to Yammer using the hubot-yammer adapter:
Install the adapter.
$ cd /opt/stackstorm/chatops
$ sudo npm install hubot-yammer
Modify
/opt/stackstorm/chatops/st2chatops.envto include the necessary adapter settings.
export HUBOT_ADAPTER=yammer
export HUBOT_YAMMER_ACCESS_TOKEN="secret_access_token"
export HUBOT_YAMMER_GROUPS="groups list"
Restart the service.
$ sudo systemctl restart st2chatops
Hubot should now connect to your chat service. Congratulations!
Please note that while we always try to help the best we can, we can’t support adapters that are
not bundled into st2chatops since they are too numerous. If you run into trouble with an
external adapter, it’s usually best to open an issue in the adapter’s GitHub repo or contact the
authors.
Hubot developers maintain a list of adapters on the Hubot documentation website.
Bring Your Own Hubot
If you already have a Hubot instance, you’ll need the hubot-stackstorm module installed and
the following environment variables set up:
ST2_APIFQDN + port to StackStorm endpoint. Typically:https://<host>:443/apiST2_AUTH_URLFQDN + port to StackStorm Auth endpoint:https://<host>:443/authST2_API_KEYStackStorm API key
Once done, start your Hubot instance. Validate that things are working correctly and that Hubot
is connecting to your client by issuing the default help command:
By default, commands from the st2 pack are installed. They are useful for getting info from
your StackStorm instance.
Note
You can issue Hubot commands in channels by using either ! or the bot’s nickname. If your
bot is named @ellie in Slack, you can use both !help and @ellie: help.
Note that if you send your command as a private message, you should just write help
without an alias or a nickname. Your bot already knows you’re talking to her and not someone
else!
If successful, proceed to the next section.
Adding New ChatOps Commands
ChatOps uses Action Aliases to define new ChatOps commands.
$ cd /opt/stackstorm/packs/
$ mkdir -p my-chatops/{actions,rules,sensors,aliases}
Now, let’s setup an alias. For the purpose of this setup aliases are stored in the directory
/opt/stackstorm/packs/my-chatops/aliases. We have already created this directory in a previous
step.
This alias will execute commands on hosts through SSH with the core.remote action. Create a
new file called remote.yaml, and add the following contents:
# packs/my-chatops/aliases/remote.yaml
---
name: "remote_shell_cmd"
action_ref: "core.remote"
description: "Execute a command on a remote host via SSH."
formats:
  - "run {{cmd}} on {{hosts}}"
Once this is all done, register the new files we created and reload Hubot:
$ sudo st2ctl reload --register-aliases
$ sudo service st2chatops restart
This will register the aliases we created, and tell Hubot to go and refresh its command list.
You should now be able to go into your chatroom, and execute the command
!run date on localhost, and StackStorm will take care of the rest.
To customize the command output you can use Jinja templates as described in Action Aliases.
Logging
ChatOps logs are written to /var/log/st2/st2chatops.log on non systemd-based distros. For
systemd-based distros, you can access the logs via journalctl --unit=st2chatops