Authentication
Hint
Just need the default password? Try username st2admin, password Ch@ngeMe.
Need to change the password? Run: sudo htpasswd /etc/st2/htpasswd st2admin.
Something more complex? Read on to learn about StackStorm authentication.
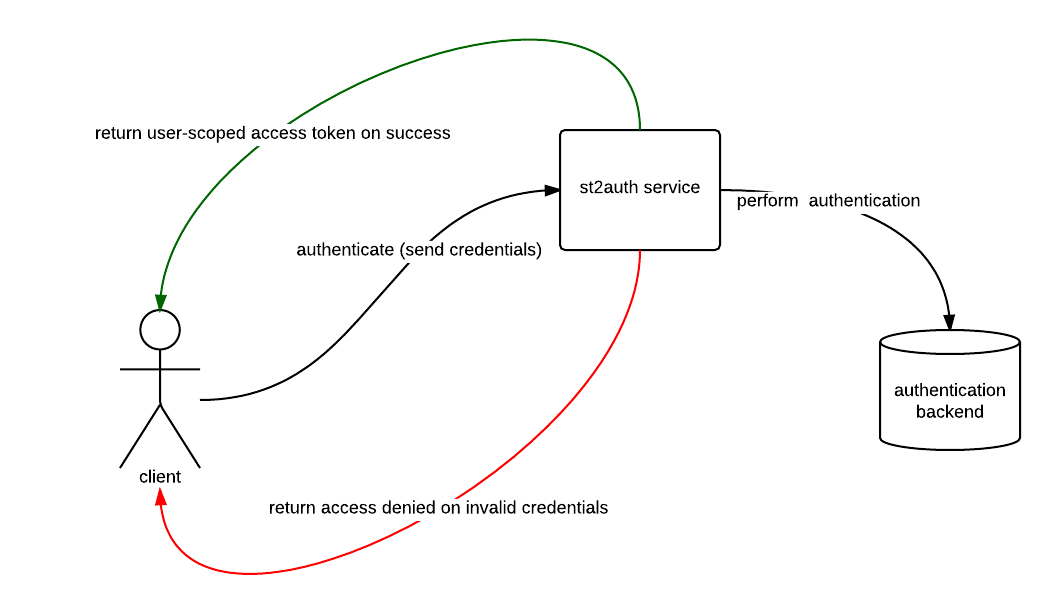
StackStorm includes an auth service that is responsible for handling user authentication and generating time-limited access tokens. When authentication is enabled (the default), those access tokens are used to authenticate against the StackStorm REST APIs.
Configuring the Service
By default, the StackStorm configuration file is located at /etc/st2/st2.conf. The settings listed
below are configured under the auth section in the configuration file. The service can be
configured with different backends (i.e. PAM, LDAP, etc.) to handle authentication. If a backend is
not specified, an htpasswd-compatible flat file authentication backend is used.
We recommend that the service be configured to listen on https (use_ssl option) and be
accessible to st2 clients.
hostHostname for the service to listen on.portPort for the service to listen on.use_sslSet to True to enable SSL/TLS mode.certPath to the SSL certificate file. Only used whenuse_sslis set to True.keyPath to the SSL private key file. Only used whenuse_sslis set to True.modeMode to use (proxyorstandalone). Default isstandalone.backendAuthentication backend to use in standalone mode (i.e.pam,flat_file). Please review the supported list of authentication backends below.backend_kwargsJSON-serialized arguments which are passed to the authentication backend in standalone mode.token_ttlThe token lifetime, in seconds. By default, the token expires in 24 hours.api_urlThe authentication service also acts as a service catalog. It returns a URL to the API endpoint on successful authentication. This information is used by clients such as the CLI and web UI. The setting needs to contain a public base URL to the API endpoint (excluding the API version). Example:https://myhost.example.com/api/enableAuthentication is not enabled for the StackStorm API until this is set to True. If running StackStorm on multiple servers, please ensure that this is set to True on all StackStorm systems.debugEnable debug mode.
If you make any changes, you must restart StackStorm:
$ sudo st2ctl restart
Standalone Auth Mode
Standalone mode is the default auth mode where external users authenticate directly with
StackStorm. Under the hood the st2auth service delegates to the configured
backend to perform the authentication. When the backend service properly
authenticates the user, an auth token is returned. This token can then be used
to make further API calls.
Proxy Auth Mode
Proxy mode can be used when there is a service (proxy) that sits in front of StackStorm
that performs user authentication (ex: load balancer, apache, nginx, etc). When
the frontend service authenticates a user, it will need to make an API call
POST https://<stackstorm>/auth/v1/tokens to the st2auth service in order
to obtain an auth token. In this request the following CGI environment variables
need to be set:
REMOTE_ADDR- Source of the request (hostname/ip of the user who authenticated against the proxy).REMOTE_USER- User identity (username) of proxy authenticated user.
The request will return an auth token that authenticated user can use to make further API calls.
When using a reverse proxy such as Apache in front of st2auth, those two CGI environment variables are usually set automatically by a proxy upon successful authentication.
Auth Backends
The service can be configured with different backends (i.e. PAM, LDAP, etc.) to handle the
authentication. If a backend is not specified, an htpasswd-compatible flat file authentication
backend is used. To use a different backend, select and install the appropriate python package from
the StackStorm community repos and configure
st2auth accordingly.
Note
When using the pam authentication backend you need to make sure that the st2auth
process runs as root otherwise authentication will fail. For security reasons st2auth
process runs under st2 user by default. If you want to use pam auth backend and change
it to run as root, you can do that by editing the service manager file for the st2
auth service.
For example, to install the package for the PAM backend manually, run the
following command on the same server where st2auth is running:
$ sudo /opt/stackstorm/st2/bin/pip install git+https://github.com/StackStorm/st2-auth-backend-pam.git@master#egg=st2_auth_backend_pam
Note
StackStorm uses a Python virtual environment in /opt/stackstorm/st2/ for StackStorm
dependencies and components.
This means that if you want to work with the StackStorm installation (e.g. use the
python binary from that virtualenv or to install a new auth backend), you
need to use the StackStorm virtual environment.
You can do so by activating the virtual environment or running
python/pip directly from the virtual environment:
# by activating the virtual environment

$ source /opt/stackstorm/st2/bin/activate

$ sudo pip install foo

# or by directly invoking binaries from the virtual environment
$ /opt/stackstorm/st2/bin/python

$ sudo /opt/stackstorm/st2/bin/pip install foo
After the backend is installed, configure the backend at /etc/st2/st2.conf, and restart StackStorm.
Specific configuration details for the backend can be found in the README at the corresponding
repo. The following is a sample auth section in the config file for the PAM backend:
[auth]
mode = standalone
backend = pam
enable = True
use_ssl = True
cert = /path/to/ssl/cert/file
key = /path/to/ssl/key/file
logging = /etc/st2/logging.auth.conf
api_url = https://myhost.examples.com/api/
debug = False
The following is a list of auth backends for the community edition to help get things started:
LDAP
Note
Prior to StackStorm 3.3, Extreme Networks provided a commercial version of the StackStorm automation platform which included LDAP auth backend. As these enterprise features were donated to the Linux Foundation, LDAP auth backend is now available in StackStorm Open Source since 3.4.
LDAP is now included by default with StackStorm core and needs to be enabled and configured via st2.conf. The source code for the LDAP auth backend can be accessed here: https://github.com/stackstorm/st2-auth-ldap
The LDAP backend authenticates the user against an LDAP server. The following is a list of configuration options for the backend:
option |
required |
default |
description |
||||||||||||||||||||||||||||||||||||||||||||||||||||||||||||||||||||||
|---|---|---|---|---|---|---|---|---|---|---|---|---|---|---|---|---|---|---|---|---|---|---|---|---|---|---|---|---|---|---|---|---|---|---|---|---|---|---|---|---|---|---|---|---|---|---|---|---|---|---|---|---|---|---|---|---|---|---|---|---|---|---|---|---|---|---|---|---|---|---|---|---|---|
bind_dn |
yes |
DN of the service account to bind with the LDAP server |
|||||||||||||||||||||||||||||||||||||||||||||||||||||||||||||||||||||||
bind_password |
yes |
Password of the service account |
|||||||||||||||||||||||||||||||||||||||||||||||||||||||||||||||||||||||
base_ou |
yes |
Base OU to search for user and group entries |
|||||||||||||||||||||||||||||||||||||||||||||||||||||||||||||||||||||||
group_dns |
yes |
Which groups user must be member of to be granted access |
|||||||||||||||||||||||||||||||||||||||||||||||||||||||||||||||||||||||
group_dns_check |
no |
and |
What kind of check to perform when validating user group membership ( |
||||||||||||||||||||||||||||||||||||||||||||||||||||||||||||||||||||||
host |
yes |
Hostname of the LDAP server. Multiple comma-separated entries are allowed. |
|||||||||||||||||||||||||||||||||||||||||||||||||||||||||||||||||||||||
port |
yes |
Port of the LDAP server |
|||||||||||||||||||||||||||||||||||||||||||||||||||||||||||||||||||||||
use_ssl |
no |
false |
Use LDAPS to connect |
||||||||||||||||||||||||||||||||||||||||||||||||||||||||||||||||||||||
use_tls |
no |
false |
Start TLS on LDAP to connect |
||||||||||||||||||||||||||||||||||||||||||||||||||||||||||||||||||||||
cacert |
no |
None |
Path to the CA cert used to validate certificate |
||||||||||||||||||||||||||||||||||||||||||||||||||||||||||||||||||||||
id_attr |
no |
uid |
Field name of the user ID attribute |
||||||||||||||||||||||||||||||||||||||||||||||||||||||||||||||||||||||
account_pattern |
no |
{id_attr}={{username}} |
LDAP subtree pattern to match user. The user’s username is escaped and interpolated into this string (see example). |
||||||||||||||||||||||||||||||||||||||||||||||||||||||||||||||||||||||
group_pattern |
no |
(|(& (objectClass=*)(|(member={user_dn})(uniqueMember={user_dn})(memberUid={username})))) |
LDAP subtree pattern for user groups. Both user_dn and username are escaped and then interpolated into this string (see example.) |
||||||||||||||||||||||||||||||||||||||||||||||||||||||||||||||||||||||
scope |
no |
subtree |
Search scope (base, onelevel, or subtree) |
||||||||||||||||||||||||||||||||||||||||||||||||||||||||||||||||||||||
network_timeout |
no |
10.0 |
Timeout for network operations (in seconds) |
||||||||||||||||||||||||||||||||||||||||||||||||||||||||||||||||||||||
chase_referrals |
no |
false |
True if the referrals should be automatically chased within the underlying LDAP C lib |
||||||||||||||||||||||||||||||||||||||||||||||||||||||||||||||||||||||
debug |
no |
false |
Enable debug mode. When debug mode is enabled all the calls (including the results) to LDAP server are logged |
||||||||||||||||||||||||||||||||||||||||||||||||||||||||||||||||||||||
client_options |
no |
A dictionary with additional Python LDAP client options which can be passed to |
|||||||||||||||||||||||||||||||||||||||||||||||||||||||||||||||||||||||
cache_user_groups_response |
no |
true |
When true, LDAP user groups response is cached for 120 seconds (by default) in memory. This decreases load on LDAP server and increases performance when remote LDAP group to RBAC role sync is enabled and / or when the same user authenticates concurrency in a short time frame. Keep in mind that even when this feature is enabled, single (authenticate) request to LDAP server will still be performed when user authenticates to st2auth - authentication information is not cached - only user groups are cached. |
||||||||||||||||||||||||||||||||||||||||||||||||||||||||||||||||||||||
cache_user_groups_cache_ttl |
no |
120 |
How long (in seconds) |
||||||||||||||||||||||||||||||||||||||||||||||||||||||||||||||||||||||
Note
By default a logical and check is performed when validating user group membership against
groups defined in group_dns config option. This means if multiple groups are specified, the
user needs to be member of all the specified groups for authentication to succeed. If you
want to use or behavior instead (user needs to be a member of one or more of the specified
groups), you can achieve that by setting the group_dns_check config option to or.
The following is a sample auth section for the LDAP backend in the st2 config file:
[auth]
mode = standalone
backend = ldap
backend_kwargs = {"bind_dn": "CN=st2admin,ou=users,dc=example,dc=com", "bind_password": "foobar123", "base_ou": "dc=example,dc=com", "group_dns": ["CN=st2users,ou=groups,dc=example,dc=com", "CN=st2developers,ou=groups,dc=example,dc=com"], "host": "identity.example.com", "port": 636, "use_ssl": true, "cacert": "/path/to/cacert.pem"}
enable = True
use_ssl = True
cert = /path/to/mycert.crt
key = /path/to/mycert.key
logging = /etc/st2/logging.auth.conf
api_url = http://myhost.example.com:9101/
debug = False
If your LDAP server uses a different name for the user ID attribute, you can simply specify the id_attr configuration option.
[auth]
mode = standalone
backend = ldap
backend_kwargs = {"bind_dn": "CN=st2admin,ou=users,dc=example,dc=com", "bind_password": "foobar123", "base_ou": "dc=example,dc=com", "id_attr": "username", "group_dns": ["CN=st2users,ou=groups,dc=example,dc=com", "CN=st2developers,ou=groups,dc=example,dc=com"], "host": "identity.example.com", "port": 636, "use_ssl": true, "cacert": "/path/to/cacert.pem"}
enable = True
use_ssl = True
cert = /path/to/mycert.crt
key = /path/to/mycert.key
logging = /etc/st2/logging.auth.conf
api_url = http://myhost.example.com:9101/
debug = False
This will need customization for your environment - e.g. the LDAP server to bind to, and the cert and key paths if you are using SSL.
Running the Service
st2auth is set up to run as a service. It runs under gunicorn.
The service can be started with one of the options below:
# Individually
sudo service st2auth start

# Individually via st2ctl
sudo st2ctl start st2auth

# Collectively with other st2 components
sudo st2ctl start

# Using the launcher for debugging purposes
sudo /usr/bin/st2auth --config-file /etc/st2/st2.conf
Testing
Run the following curl commands to test:
# If use_ssl is set to True, the following will fail because SSL is required.
curl -X POST http://myhost.example.com/auth/v1/tokens

# The following will fail with 401 unauthorized. Please note that this is executed with "-k" to skip SSL cert verification.
curl -X POST -k https://myhost.example.com/auth/v1/tokens

# The following will succeed and return a valid token. Please note that this is executed with "-k" to skip SSL cert verification.
curl -X POST -k -u yourusername:'yourpassword' https://myhost.example.com/auth/v1/tokens

# The following will verify the SSL cert, succeed, and return a valid token.
curl -X POST --cacert /path/to/cacert.pem -u yourusername:'yourpassword' https://myhost.example.com/auth/v1/tokens
Usage
Once authentication is enabled, API calls require a token to be passed via the headers. CLI calls
require the token to be included as a CLI argument or as an environment variable. Using st2 login
will simplify logging in, getting a token, and automatically adding it to the environment.
To use the CLI, use the st2 login command. If you do not provide a password, it will prompt for
the password:
# without password
st2 login yourusename
Password:

# with password
st2 login yourusername -p 'yourpassword'

# write password to config file
st2 login -w yourusername -p 'yourpassword'
Note
If your password contains special characters such as $, they may be interpreted by the shell.
Wrap your password in single quotes (') as above.
If you need to acquire a token - for example to use with an API call, use the st2 auth command.
If a password is not provided, it will prompt for the password. If successful, a token is returned
in the response:
# with password
st2 auth yourusername -p 'yourpassword'

# without password
st2 auth yourusename
Password:
The following is a sample API call via curl using that token:
$ curl -H "X-Auth-Token: 4d76e023841a4a91a9c66aa4541156fe" https://myhost.example.com/api/v1/actions
This is the CLI equivalent:
# Include the token as command line argument.
st2 action list -t 4d76e023841a4a91a9c66aa4541156fe

# Or set the token as an environment variable.
export ST2_AUTH_TOKEN=4d76e023841a4a91a9c66aa4541156fe
st2 action list
There may be use-cases where you want a token with a different TTL from the default. You can specify a TTL (in seconds) when you request a token. For example, to request a token that is valid for 10 minutes:
# with TTL and password
st2 auth yourusername -p 'yourpassword' -l 600
Note that if the TTL requested is greater than the configured maximum allowed TTL, you will get an error.
If you don’t want to retrieve a new token and configure the environment variable every time you start a new shell session, you can put your StackStorm credentials in the CLI configuration file. Then the CLI will automatically authenticate, retrieve and cache the auth token for you.
For information on how to do that, see the CLI configuration page.
API Keys
StackStorm also supports API keys. These differ from tokens in that they do not expire. This makes them suited for integrations with other applications, e.g. through webhooks.
All API key management is currently available via the StackStorm CLI or API.
To create an API key:
st2 apikey create -k -m '{"used_by": "my integration"}'
<API_KEY_VALUE>
Note
For security purposes the <API_KEY_VALUE> is only shown at create time. StackStorm itself does not store this API Key value in its database, only a one-way hash is stored. It is not possible to retrieve an API Key after creation. If the API Key is lost or not recorded at the time of creation, delete the API Key and create a new one.
The optional -m attribute allows metadata to be associated with the created key. It is good
practice to assign a meaningful value like the external service which uses this key to authenticate
with StackStorm.
The CLI for API keys also support get, list, delete, enable and disable commands.
If an API Key is disabled it will disallow access until that API key is enabled again. This is a good way to temporarily revoke access of an external service to StackStorm.
API Key Usage
API keys are designed for API access. As of now they cannot be used via clients like the UI and CLI.
The following are sample API calls via curl using API Keys:
$ curl -H "St2-Api-Key: <API-KEY-VALUE>" https://myhost.example.com/api/v1/actions
$ curl https://myhost.example.com/api/v1/actions?st2-api-key=<API-KEY-VALUE>
API Key Migration
API keys can be migrated from one StackStorm instance to another. This way external services that have already been configured with API Keys do not need to be updated with a new set of keys. Follow these steps to migrate:
On the old StackStorm instance run the following command to save API keys into a file. Note that secrets are masked, based on configuration setting. If masking is enabled an admin can on a per-API call basis disable the masking without having to make config changes. See Configure secrets masking to see how to disable masking on a system wide basis.
$ st2 apikey list -dy --show-secrets > apikeys.yaml
Transfer the file to the new StackStorm instance, and load the keys from file:
$ st2 apikey load apikeys.yaml
Using Authentication Tokens or API Keys with the API
To authenticate against the StackStorm API, either an authentication token or an API key (but not both)
should be provided in the HTTP request headers. The headers are named X-Auth-Token and
St2-Api-Key respectively.
If for some reason you can’t specify an auth token or API key in the headers (e.g. you are using a
third party service to integrate with StackStorm and this service doesn’t allow you to specify custom
headers), you can provide it as a query parameter named x-auth-token and st2-api-key
respectively.
Note
Keep in mind that using HTTP header is preferred since some web servers and third party services log query parameters which are sent with each request. This could lead to auth token / api key exposure and potentially pose a security risk.
Here’s some examples of how to send authentication token and API key in the headers, and as a query
parameter using curl:
Providing it in the request headers:
$ curl -H "X-Auth-Token: <auth token value>" https://myhost.example.com/api/v1/actions
$ curl -H "St2-Api-Key: <api key value>" https://myhost.example.com/api/v1/actions
Providing it as a query parameter:
$ curl "https://myhost.example.com/api/v1/actions?x-auth-token=<auth token value>"
$ curl "https://myhost.example.com/api/v1/actions?st2-api-key=<api key value>"